WordPress is a popular open-source content management system (CMS) that makes it easy for users to create websites, blogs, and online stores. It was initially started as a blogging platform in 2003, but it has since matured into a full-featured CMS, allowing one to build any web application with its help. WordPress offers two options: Hosted (WordPress.com) and Self-hosted (WordPress.org). The former version handles all the technical aspects, but it has limitations unless you are subscribed to the premium plan. In contrast, the latter version requires web hosting and provides complete control over your website, offering more flexibility. This article outlines the utility value of Local, a WordPress development kit.
WordPress Development With Local
You need to set up a local WordPress environment to make development easier and more seamless for your WordPress website. There are several options for a WordPress development environment. In my experience, LocalWP, also commonly known as Local, is the best alternative to XAMPP and WampServer. The best part of Local is that you don’t need additional configuration; install this tool and run the website locally. Local ships WP-CLI, Composer (a PHP package manager), easy setup of a virtual host (Site domain), and SSL support from the User Interface. In addition, you can run multiple isolated virtual environments locally in Local to host sites.
To run any local site, you need to run the following sequence of operations:
- Launch the
Local application.
- Choose by clicking on the local site to run.
- Click on the
Start site button on the top-right of the Window.
You can easily launch the WP-CLI by clicking on the Site Shell button. Similarly, you can quickly navigate to the WordPress site folder by clicking on the Site Folder button. Having a virtual host, such as an SSL-enabled site domain, makes your development journey feel like a live hosting environment, enabling you to develop and test external APIs, such as Facebook Apps and Google Site Apps, that require an SSL-enabled domain.
The actual value of the Local lies in its ability to automatically configure a virtual host with SSL, since manually configuring a virtual host and SSL is usually hard work.
Implementing the WordPress Coding Standard in Local
Local uses isolated, containerized environments for each site and accordingly installs PHP and Composer locally per site. The PHP and Composer installed in a site’s shell are not globally accessible from your system’s main terminal or from other site containers. For the global installation of the coding standard, Composer should be installed globally as well. Therefore, it is recommended to install the Coding Standard locally, tailored to a specific site, for a seamless, hassle-free coding experience.
The WordPress coding standard helps create a consistent and secure codebase within the WordPress project. To install the WordPress coding standard (as supported by PHP_CodeSniffer), you need to have two information: the full path to the PHP executable and the local site directory or the global scope in which to install the WordPress coding standard.
Clicking the Site shell button in Local’s User Interface gave the following output:
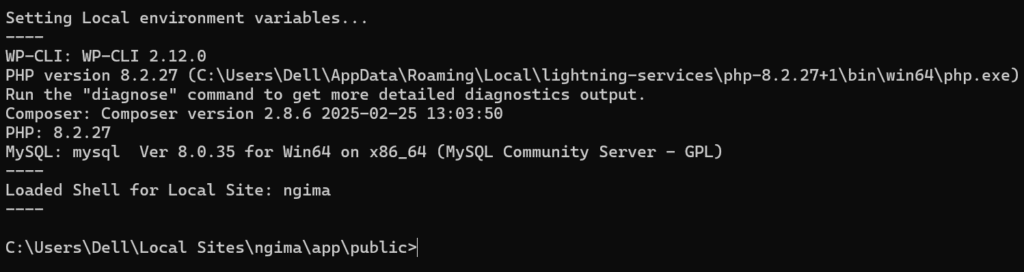
Take a look at the PHP version and full path to PHP executable in parenthesis. Since the shell command is in the public working directory, we intended to install the coding standard in the wp-content folder so it tracks only themes and plugins, not core WordPress resources. Type cd wp-content in the terminal and hit Enter to navigate. Additionally, you can use the where composer command to get the installation directory of Composer.
Composer Commands for Installation of WPCS
Run the following two commands in the shell to install the two required packages for WordPress coding standard: PHP_CodeSniffer and WPCS.
composer require squizlabs/php_codesniffer=* --dev
composer require wp-coding-standards/wpcs --dev --with-all-dependencies
The --dev flag indicates development packages, and the –with-all-dependencies flag allows upgrades, downgrades, and removals for packages currently locked to specific versions. If everything works as expected, you can see the list of available coding standards with the phpcs -i command. If you do not see WordPress as the coding standard in the output, you need to configure the installed_paths of the WordPress installation, which the PHP_CodeSniffer makes use of. For this, run the following command:
phpcs --config-set installed_paths "%USERPROFILE%/AppData/Roaming/Composer/vendor/wp-coding-standards/wpcs"
And, again, rerun the command phpcs -i to verify the installation of the WordPress coding standard. If you want to remove the installed coding standards, you can just run the following commands to remove the .vendor/bin directory.
composer remove wp-coding-standards/wpcs --dev
composer remove squizlabs/php_codesniffer --dev

composer update
composer clear-cache
You can proceed to the installation of the coding standard, following the official PHP_CodeSniffer and blog article WordPress Coding Standard with PHP_CodeSniffer. Also, please keep in mind the full path to the PHP Executable and the project-wide (local site directory) or system-wide (global directory) directory to integrate with VS Code.
PHPCS Integration With VS Code
When using LocalWP, PHP_CodeSniffer works correctly in the site shell, but not in the VS Code terminal. This is a common issue due to environmental differences. The LocalWP’s Site Shell uses its own PHP + Composer virtual environment, and it automatically adds that environment to the shell PATH. In contrast, the VS Code terminal uses your system’s global environment or system PATH, unless you explicitly configure it to use LocalWP’s environment, which it doesn’t do by default.
To make VS Code work as a Site shell, open VS Code with the same environment as the site shell. For this do any of the following methods to open VS Code:
- Open the site shell and run the
code . command.
- Use a project-level .vscode/settings.json:
{ "phpcs.executablePath": "C:\\Users\\User\\Local Sites\\ngima\\app\\public\\wp-content\\vendor\\bin\\phpcs.bat" }
Moreover, if you want to open VS Code and access the phpcs from the system-wide location, you need to set up the system path variable to C:\Users\User\Local Sites\ngima\app\public\wp-content\vendor\bin. Additionally, add the %USERPROFILE%\AppData\Roaming\Composer\vendor\bin system path variable if you have installed PHP_CodeSniffer globally (system-wide) to be accessible from elsewhere.
Installation of VS Code Extensions
You need the PHP Sniffer extension by wongjn to integrate the WordPress coding standard in VS Code. The extension uses PHP_CodeSniffer to format and lint PHP code. Install these extensions in VS Code by pressing Ctrl+P on Windows or Cmd+P on Mac to open the Quick Open dialog, type ext install phpcs or phpcbf to find the extension, and click the required extension to install it.
Configuring VS Code for WPCS
Configure the settings.json configuration file of VS Code with the following code:
{
  "php.validate.executablePath": "C:\\Users\\Dell\\AppData\\Roaming\\Local\\lightning-services\\php-8.2.27+1\\bin\\win64\\php.exe",
  "phpSniffer.run": "onSave",
  "phpSniffer.autoDetect": true,
  "phpSniffer.executablesFolder": "C:\\Users\\Dell\\Local Sites\\ngima\\app\\public\\wp-content\\vendor\\bin",
  "phpSniffer.standard": "WordPress",
  "[php]": {
    "editor.tabSize": 4,
    "editor.defaultFormatter": "wongjn.php-sniffer"
  },
  "files.associations": {
    "*.php": "php"
  }
}
Now you can run the coding standard for linting and format the code as a default code formatter. Press Shift+Alt+F to format the entire code in the open PHP file, or Ctrl+F or Ctrl+K to format the selected code. Click Ctrl+S to save and format the file as provided by the JSON configuration "phpSniffer.run": "onSave" on each save event.
WordPress Stubs For Documentation
PHPCS and WPCS are linters that provide code style, PHPDoc formatting, and security best practices. They are not function reference tools and, accordingly, they don’t provide you with the WordPress function and class information. You can use WordPress Stubs to access WordPress-specific documents, including function-level documentation tips and usage recommendations. For this, go to the project directory and run the following command:
composer require --dev php-stubs/wordpress-stubs
This will install all WordPress function and class definitions into .vendor/php-stubs/wordpress-stubs/ directory. Then configure VS Code to use Intelephense in one of the following ways:
Add Item value as C:/Users/<Username>/Local Sites/ngima/app/public/wp-content/vendor/php-stubs/wordpress-stubs by navigating to File > Preferences > Settings > Extensions > intelephense > Environment: Include Paths.
OR
Configuring the settings.json file with the following lines:
  "intelephense.environment.includePaths": [
    ""C:\\Users\\User\\Local Sites\\ngima\\app\\public\\wp-content\\vendor\\php-stubs\\wordpress-stubs",
  ],
Now, with the integration of WordPress Stubs, Intelephense can provide significantly better documentation and autocomplete for all WordPress functions and classes when hovering over their names.
Please note that to receive the best Intelephense support, you need to open the public directory, where all WordPress assets are installed, in VS Code. This is because Intelephense requires all references to WordPress core files to index them, making WordPress Stubs and definitions available so that theme and plugin development work perfectly. Take care and avoid opening a theme or plugin folder unless explicitly configured to do so.
Please read the WordPress Coding Standard with PHP_CodeSniffer for more information on configuring the settings.json and tasks.json files. In addition, you may read the WordPress Environment with the wp-env Package to use wp-env package for a Docker-based WordPress development environment.