The wp-env package makes it easy to develop and test themes and plugins. This is a WordPress-maintained package for a local WordPress development environment. This package helps you create a local WordPress development environment instantly, with zero configuration, in a directory of your choice.
Install Node.js Application
The wp-env package requires Node.js to run JavaScript packages. If you have not installed Node.js on your machine, download the installer from the official website and install the application.
Install the Required Docker Desktop Application
The wp-env creates a development environment where WordPress, a Web Server, and a database interact. In addition, the wp-env package requires Docker, which creates an isolated, consistent, and production-like environment for local theme and plugin development. Docker packages WordPress, a Web Server, and databases into a virtualized application called a container. The use of Docker containers makes application development and deployment easier than ever. So, download the appropriate installation file from Docker’s website. On a Windows machine, open a Command Prompt and run echo %processor_architecture% to view the system’s architecture. This will give you the processor type, and you can download the appropriate installation file from there. After successful installation, launch the Docker application and usually follow the recommended setup.
Install wp-env Package
You can install wp-env locally to a project-wide scope or globally at the system-wide scope. To install it globally, use the -g flag with the installation command. The global installation is recommended because it can be accessed from any project on your machine. Open the terminal, and run the following command to install the wp-env package globally:
npm -g install @wordpress/env
However, if you want to keep the global scope clean, you can install this package as a development dependency to a project with the following command:
npm i @wordpress/env --save-dev
To confirm the installation, run the wp-env --version command to check the version of the wp-env package. In any case, if you need to uninstall the wp-env package, run the following command:
npm -g uninstall @wordpress/env
You may run the npm root -g command to view the installation directory of the wp-env CLI tool. This is usually the directory: C:\Users\<Username>\AppData\Roaming\npm\node_modules.
You can review the official guidelines for installing the wp-env package at this link.
Starting Development Environment
First, make sure Docker is running by checking the Docker icon in the system tray. Then navigate to the directory containing WordPress themes, plugins, or other project directories, and run the wp-env start command to start the WordPress environment. The wp-env start command generally installs WordPress, the database, and other resources in C:\Users\<Username>\.wp-env\ directory on the Windows machine. The wp-env creates a Docker instance behind the scenes, and the development and test environment containers are created, mounting the downloaded WordPress resources.
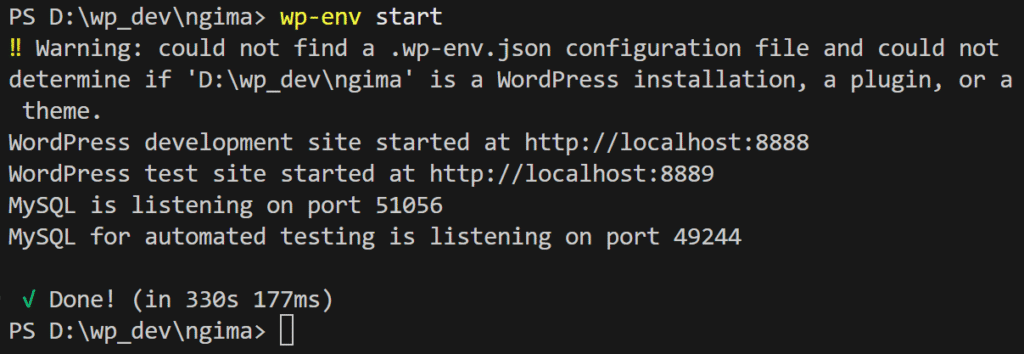
After the script runs, the local WordPress development environment can be accessed at http://localhost:8888, automatically running and activated. Similarly, the test environment for unit and end-to-end tests can be accessed via http://localhost:8889, as shown in the picture above. However, the error message may appear saying “‼ Warning: could not find a .wp-env.json configuration file and could not determine if ‘directory path’ is a WordPress installation, a plugin, or a theme.” for the first time you run the script. The tool tries to auto-detect the project folder type based on the wp-config.php file, style.css, the PHP plugin header, and the .wp-env.json configuration file, in that order. If it does not detect any of that information, then it populates the error message.
Likewise, when you run the wp-env start command the next time to start the local environment, you may get a RequestError … ETIMEDOUT error, primarily not because of a mis-configured .wp-env.json file, but because of a slower network or flaky IPv6 support. The first indication of this error is a console message stating “Reading configuration”. If this happens, close all terminals, open PowerShell as an Administrator, run the following commands sequentially, restart Docker, and then rerun the wp-env start command.
setx NODE_OPTIONS "--network-family-autoselection-attempt-timeout=5000 --dns-result-order=ipv4first"

// Be cautious with this command, as it resets the WordPress database.
// Resetting the database deletes all posts, pages, media, and other content in the local WordPress installation.
wp-env clean all
Navigate to http://localhost:8888/wp-login.php to log in to the WordPress dashboard using username admin and password password. Moreover, you can stop the dev server with the wp-env stop command after you have completed developing.
Installing WordPress Coding Standards
Installation of WordPress coding standards will be easy with Composer, a PHP package manager. You can go through the WordPress Coding Standard with PHP_CodeSniffer article to know about how to install Composer, PHP_CodeSniffer, and WPCS. Also, you could read WordPress Development Easier with Local to get more insights about the WordPress coding standard and WordPress Stubs.
The global installation of PHP_CodeSniffer results in the .vendor/bin directory in the C:/Users/<Username>/AppData/Roaming/Composer directory. The .vendor/bin directory contains the phpcs and phpcbf applications for checking coding standards. However, these applications need WPCS to verify compliance with the WordPress coding standards. The WordPress Coding Standard with PHP_CodeSniffer article explains how to install the WPCS package, or you may also read the WPCS installation guide.
Assuming that you have installed PHP, Composer, PHP_CodeSniffer, WPCS, and WordPress Subs globally, the settings.json file of VS Code may look like this:
{
  "php.validate.executablePath": "C:\\wamp64\\bin\\php\\php8.3.6\\php.exe",
  "phpSniffer.run": "onSave",
  "phpSniffer.autoDetect": true,
  "phpSniffer.executablesFolder": "C:\\Users\\<Username>\\AppData\\Roaming\\Composer\\vendor\\bin",
  "phpSniffer.standard": "WordPress",
  "[php]": {
    "editor.tabSize": 4,
    "editor.defaultFormatter": "wongjn.php-sniffer"
  },
  "files.associations": {
    "*.php": "php"
  },
  "intelephense.environment.includePaths": [
    "C:\\Users\\<Username>\\AppData\\Roaming\\Composer\\vendor\\php-stubs\\wordpress-stubs",
    "C:\\Users\\<Username>\\.wp-env\\ff341ed2b3d297c71f4655227ee429a8\\WordPress",
  ],
}
The above JSON configuration assumes the use of PHP Sniffer by wongjn and PHP Intelephense VS Code extensions. After successfully configuring these tools, WordPress development will be easy and smooth.