Key Takeway
The Docker containerized WordPress development environment may face Docker lookback networking issue. This results in the REST API error in WordPress site stats in admin dashboard. You need to configure Apache to listen to multiple ports to resolve the issue.
The Docker Loopback Networking Issue
When you use docker container to create WordPress development environment, then your WordPress site health may report that “The REST API Encountered an Error”. The full text of the error looks something like:
The REST API is one way that WordPress and other applications communicate with the server. For example, the block editor screen relies on the REST API to display and save your posts and pages.

When testing the REST API, an error was encountered:

REST API Endpoint: http://localhost:8080/wp-json/wp/v2/types/post?context=edit
REST API Response: (http_request_failed) cURL error 7: Failed to connect to localhost port 8080 after 0 ms: Could not connect to server
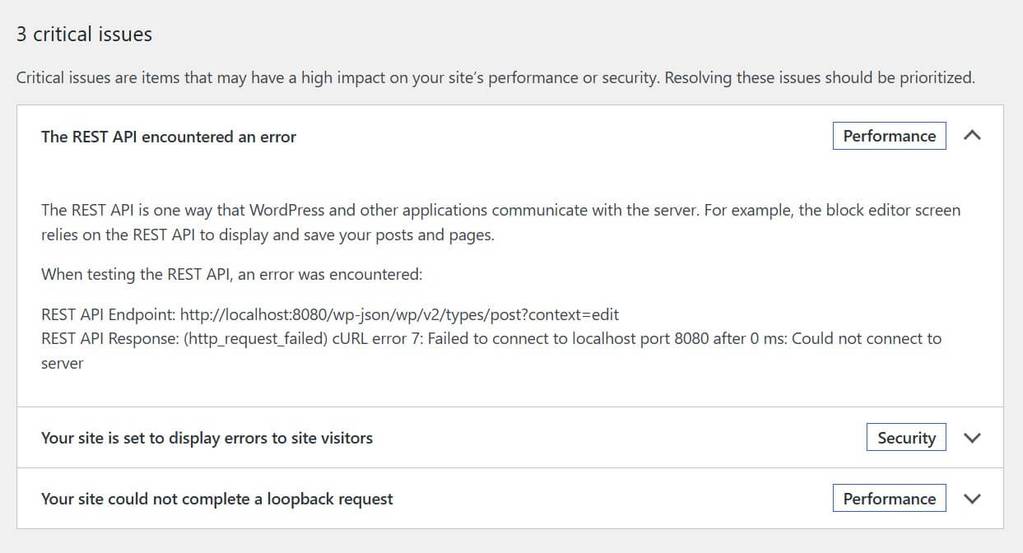
The error means that WordPress cannot connect to its own REST API endpoint at http://localhost:8080. Since you are developing the WordPress using docker, it is the Docker lookback networking issue. Generally with the docker, windows accesses WordPress through port 8080 (Docker publishes WordPress on port 8080) and WordPress container listens on port 80. That means windows browser accesses WordPress at http://localhost:8080 and Apache listens on port 80 inside WordPress container. Therefore, localhost:8080 is not the correct address for Apache inside WordPress container.
This is the reason why WordPress Site Health reports “cURL error 7: Failed to connect to localhost port 8080 …”
If this error appears, then take the following steps to fix it:
Configure Apache to Listen on Port 8080
Create an Apache configuration file file in ./docker/ folder using the following command in PowerShell:
New-Item -ItemType Directory -Force .\docker
notepad .\docker\apache-loopback.conf
Then, add the following configuration code in the file and save. In addition, ensure that Windows does not save this configuration file in .txt format.
Listen 8080

<VirtualHost *:8080>
    ServerName localhost
    DocumentRoot /var/www/html

    <Directory /var/www/html>
        Options FollowSymLinks
        AllowOverride All
        Require all granted
    </Directory>

    ErrorLog ${APACHE_LOG_DIR}/loopback-error.log
    CustomLog ${APACHE_LOG_DIR}/loopback-access.log combined
</VirtualHost>
Mount the Configuration in Compose YAML file
Under the volumn section of your wordpress service, add the following configuration:
volumes:
  - ./wp_core:/var/www/html
  - ./wp-content:/var/www/html/wp-content
  - ./docker/apache-loopback.conf:/etc/apache2/conf-enabled/zz-loopback.conf:ro
Restart the Container and Verify the Configuration
Run the following command to recreate the WordPress container:
docker compose up -d --force-recreate wordpress
Check the Apache configuration with the following code that should results in ” Syntax OK”.
docker exec wp_dev apache2ctl configtest
Then, check the default 80 apache port and 8080 port if apache listens to both ports with the following commands:
docker exec wp_dev curl -I http://localhost/
docker exec wp_dev curl -I http://localhost:8080/wp-json/
If both the commands should return the “HTTP/1.1 200 OK” response, then the REST API loopback error should disappear in WordPress Admin → Tools → Site Health → Status.
Conclusion
The code example assumes the wp_dev wordpress container in docker. The ultimate results of the article is that it resolves the issue of WordPress container not listening on port 8080. This results because windows host port mapping (8080:80) does not make port 8080 available inside the container. Therefore, it needs to configure Apache to listen on both 80 and 8080 ports.
You may like to read How to Set Up a Local WordPress Development Environment with wp-env and Docker?
You may also read How to Install PHP_CodeSniffer (PHPCS) and WordPress Coding Standards (WPCS) for WordPress Development.