WP-Cron is a WordPress-specific event scheduling tool that helps you check for updates and publish scheduled posts in core WordPress. It mimics the concept of a real Cron job available on UNIX systems.
WP-Cron checks for scheduled tasks every time a page loads and runs any due tasks. However, if there is no request for a page and the page does not load until 5:00 PM for a task scheduled for 2:00 PM, the task won’t run until then, potentially causing a scheduling error and causing WP-Cron to fail. So, WP-Cron is not a real Cron, a system scheduler; you’ll need to use the real Cron job to ensure the event occurs at the specified time.
The system scheduler does not retry running the failed schedule. But the WP-Cron queues all scheduled tasks and runs them the next time the page loads. WP-Cron will ensure the event runs, but we don’t know when.
Running WP-Cron with Custom Hook
To run the WP-Cron job, you must create a custom hook and attach a function to it. You can achieve this by using the add_action() hook as follows:
add_action( 'topicbin_custom_hook', 'topicbin_custom_hook_exec' );
The first parameter is the name of the custom hook you have chosen, and the second is the function to call. The custom function topicbin_custom_hook_exec performs the task, and the custom hook topicbin_custom_hook adds that task to the scheduler.
wp_schedule_event() is the function used to run recurring tasks in WP-Cron. It requires three parameters: a UNIX timestamp to run the next scheduled task, an interval to recur the task, and a custom hook name to invoke. You can see the code below, for example:
wp_schedule_event( time(), 'thirty_seconds', 'topicbin_custom_hook' );
As the time() function provides the current time, the custom hook, topicbin_custom_hook, should be immediately invoked. Note that thirty_seconds is a custom interval, which is registered with the cron_schedules filter hook in the code presented in the next subheading.
A critical aspect of wp_schedule_event() is that it schedules the same event (with the same hook name) multiple times on each page load, which calls it. The ultimate result is that it schedules the same task several thousand times. Therefore, you can schedule an event only if it is not expected to run, thereby avoiding the task queue. For this, you can use the wp_next_scheduled() function to check if a hook is already scheduled. This function takes a single parameter, the hook name, and returns false if the task is not expected to run, or a string containing the next execution timestamp. For example,
if ( ! wp_next_scheduled( 'topicbin_custom_hook' ) ) {
    wp_schedule_event( time(), 'thirty_seconds', 'topicbin_custom_hook' );
}
Custom WP-Cron Intervals
The custom WP-Cron interval allows you to run a task at your desired time interval. WordPress provides hourly, twicedaily, daily, and weekly intervals by default. You can create a custom interval using the cron_schedules filter hook like so:
add_filter( 'cron_schedules', 'topicbin_add_custom_cron_interval' );
public function topicbin_add_custom_cron_interval( $schedules ) {
	$schedules['thirty_seconds'] = array(
		'interval' => 30,
		'display'  => esc_html__( 'Every Thirty Seconds', 'topicbin' ),
	);
	return $schedules;
}
The event will fire twice a minute, addressing your custom need, provided that the server receives sufficient page requests.
Using Real Cron or System Task Scheduler
The main drawback of WP-Cron is that it does not run continuously, especially if it does not receive sufficient page requests. This can be problematic if you need to run a task on time. However, there is a system task scheduler or a real Cron job to rescue you from this problem that ensures the task runs on time.
To use the system task scheduler, you only need to request WordPress’s wp-cron.php file. When this file receives the page request, the task runs at the specified time. Many web hosting companies, such as Namecheap, have wget installed on their Linux server systems. This tool makes calling the WordPress Cron script super easy. The following is an example I have used to set up the real Cron job that runs daily to send birthday wishes.
Setting the Real Cron Job
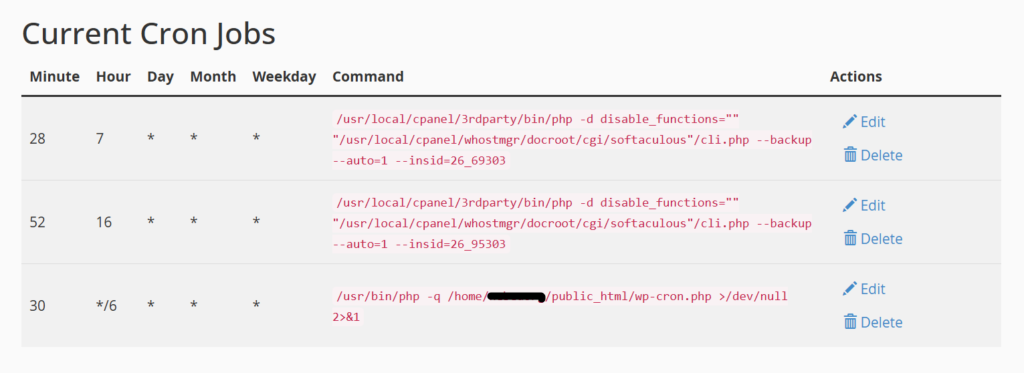
To create a real Linux Cron, log in to your cPanel account and navigate to the Advanced tab. Click on Cron Jobs and then on Add New Cron Job to create a new Cron job. I have created a Cron job that runs every 6 hours, at 30 minutes past the hour. Look at the following screenshot from my cPanel account. As you can see, the first two scripts are for Softaculous to back up the WordPress site, and the last script is the Cron job to send birthday wishes. I have also hidden the cPanel username in the command script for security reasons. The command script is responsible for creating a server request for the wp-cron.php file four times a day. This way, the system Cron job ensures the scheduled events run at the stipulated time.
However, running the WP-Cron and the system task scheduler together consumes system resources unnecessarily. Therefore, it is better to disable WP-Cron. To do so, open the wp-config.php file in your root WordPress directory, locate the DISABLE_WP_CRON constant, and change its value to true. The result should look similar to the following code:
define( 'DISABLE_WP_CRON', true );
Unscheduling the Scheduled Tasks
Remember that WordPress will continue to execute the scheduled tasks even when they are not in use, even if the plugin has been deactivated or removed. Therefore, you need to unschedule the scheduled tasks, and this is achieved by using the wp_unschedule_event() WordPress function. I want to point out that an important place to remember to unschedule your tasks is upon plugin deactivation, by using the register_deactivation_hook() function. The actual code example to unschedule the scheduled task is as follows:
register_deactivation_hook( __FILE__, 'topicbin_deactivation_function' );

function topicbin_deactivation_function() {
    $timestamp = wp_next_scheduled( 'topicbin_custom_hook' );
    wp_unschedule_event( $timestamp, 'tobincin_custom_hook' );
}
The wp_unschedule_event() function takes two parameters: the timestamp of the next scheduled task and the name of the hook. Using the wp_next_scheduled() function simplifies getting the timestamp of the next scheduled task. Additionally, I’d like to note that the wp_unschedule_event() function not only unschedules the next scheduled task but also all future occurrences of tasks.